
How to unblock someone on Snapchat? Seems like a tiresome job? No need to worry. It’s a simple task if know the method very well. Here, we are ready to help you to unblock any friends, relatives, or any other persons who have been blocked by you knowingly or accidentally.
In this tutorial, you can see the simplest way to unblock someone on Snapchat. So just read the article carefully to get an easy jump to the blocked list in Snapchat. So it saves you some time.
From the List of the blocked ones, you can unblock each one according to your wish. The list of blocked Snapchatters will be available in that sections. So without further ado, let’s move to the steps to unblock the person on Snapchat.
How to Unblock someone on Snapchat
- Open the Snapchat App. In the Camera option, tap on the Profile icon which can be seen at the left top of the screen.
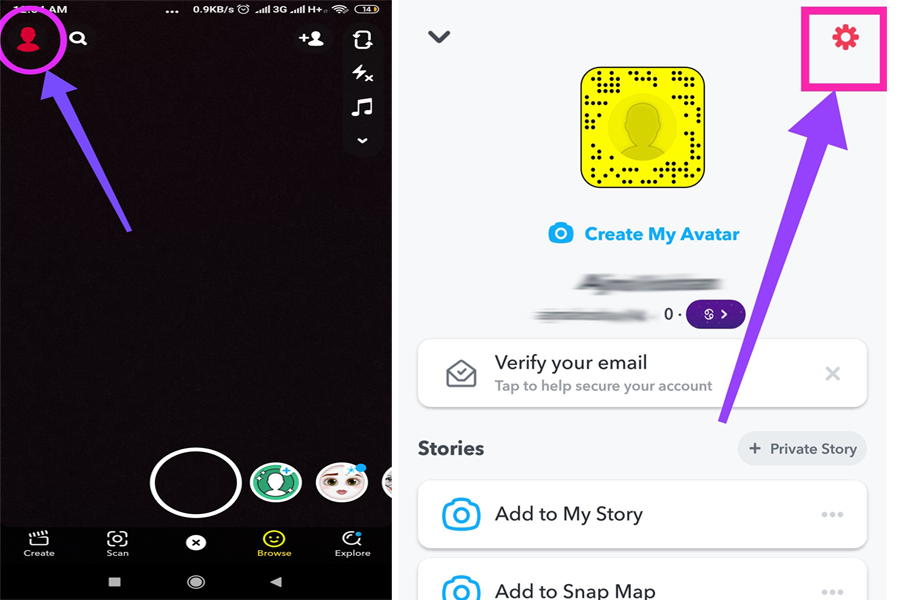
- In the Profile section, You can see a Gear icon (Settings) at the top right of the screen.
- In the settings section, there are main menus such as “My Account “, “Additional Services“, “Who can…“, “Privacy“, “Support“, “Feedback“, “More Information“, “Account Actions“.

- From the “Account Actions” menu, you could see the submenu ” Blocked“
- Tap on “Blocked”.

- After tapping on the menu, the list of blocked ones can be seen. At the Right part of each blocked one, a cross mark is shown. Tap on the Cross Mark.
- A confirmation question will be displayed on the screen as, “Are you sure you want to unblock this Snapchatter? “
- Confirm it by tapping on the “Yes” button.

- Finally, It’s done.
You can directly follow this path, Settings > Account Actions > Blocked. After opening the Settings just scroll down to the bottom of the Section.
From the Author’s Desk
Finally, you have completed reading this article. Now you can make use of the easiest way to unblock someone on Snapchat. Many users were actually facing some issues while trying to unblock a Snapchatter for the first time. Now we think that the problem is solved. If you still have doubts regarding this, just post them in the comment section. We’ll get back to you soon.
Related:

")
