If you are a hardcore PC gamer, graphic designer, or video editor, you’ve definitely heard about graphics cards. And, sometimes you may want to check the specifications, model, and other information regarding the graphics card or GPU residing on your system. Knowing the graphics card information can help you know whether your system is going to support an upcoming game or professional apps like Adobe Illustrator, Premiere before you purchase it.
Now, the scope of a graphics card, display card, or video card is not bound to merely gaming, video editing, and animation. It is capable of serving its function in even cryptocurrency mining too. Anyways, having an idea about the basic details of the graphics card on your PC can be beneficial. In this Windows 11 guide, we’ll walk you through 10 methods to check graphics card on Windows 11 OS along with screenshots. So let’s dive in.
Contents
- 1. How to Check Graphics Card on Windows 11 Using Settings
- 2. How to Check Graphics Card Using Control Panel
- 3. How to Check Graphics Card Details Using System Information
- 4. How to Check Graphics Card Details Using Task Manager
- 5. How to Check Graphics Card Details Using Device Manager
- 6. How to Check Graphics Card Details Using DirectX Diagnostic Tool
- 7. How to Check What Graphics Card You Have with Command Prompt
- 8. Check What Graphics Card Do I Have Using PowerShell
- 9. How to Check Graphics Card Details Using Third-Party Program
- 10. How to Check Your Graphics Card Model Physically
- Figure Out Your Graphics Card Details With Ease!
1. How to Check Graphics Card on Windows 11 Using Settings
The most basic method of finding graphics card details is using advanced display settings in Windows 11. To look over the video card details, follow the steps below.
- Open Settings. (Keyboard shortcut: Windows key + I)
- Click on System > Display or simply click here: [Open Display Settings]

- Scroll down and click Advanced display option under Related settings.

- Under the Display information section, click on the link that says Display adapter properties for Display 1 (Here I have only one display connected. If you have multiple displays connected you can check the adapter details of all displays.)

- A new window will open up and display the graphics adapter information like chip type, total available graphics memory, dedicated video memory, system video memory, shared system memory, etc.

2. How to Check Graphics Card Using Control Panel
The second method to locate graphics card information on your PC is via the dedicated Control Panel of the GPU (Graphics Processing Unit). If you have a GPU from Intel, AMD, or NVIDIA you can use the respective control panels to find details and adjust settings. Here I’ll show you how to find graphics card details from NVIDIA Control Panel.
- Open your Windows Control Panel. You can do this by using the Search feature available right in the taskbar.
- Now, click on Hardware and Sound.
- Click on NVIDIA Control Panel.
- Once the control panel opens up, click on the System information link at the bottom-left corner.

- After that, click Display tab. Right below the System information, you’ll find the Graphics card information label with all the details listed out.

3. How to Check Graphics Card Details Using System Information
- To launch the System information window, first press Windows key + R to open Run dialog and then type msinfo32.
- In the system summary pane at the left, expand Components and then click on Display.

Here you can see all the details of your graphics adapter like make, model, driver information, and more.
4. How to Check Graphics Card Details Using Task Manager
To find out the graphic card installed on your PC using Task Manager, use these steps.
- First off, open the Task Manager. You cannot launch the Task Manager by right-clicking on the taskbar as we used to do in Windows 10. Instead, you can right-click on the Start Button and then select Task Manager. Or, you can easy do this by using the keyboard shortcut: Ctrl + Shift + Esc.
- Click on the tab that says Performance.
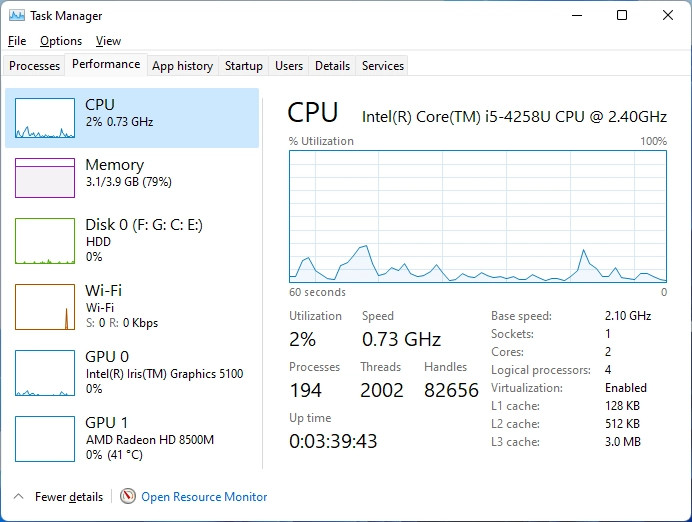
- Now, click on GPU. You can now see the graphics card model at he top-right corner.

The video card details that you get from the task manager includes percentage of utilization, GPU memories, driver version, DirectX version, physical location, and more.
5. How to Check Graphics Card Details Using Device Manager
Follow the below-given steps to determine the graphics processor details on your system.
- Open the Run dialog using Windows key + R and issue the command “devmgmt.msc” in it.
- Now, expand the option that says Display adapters.

- Confirm the model and manufacturer of the graphics card.
- To reveal more information about your card, simply double-click on the name of the card and you will be presented with another window with additional details.

6. How to Check Graphics Card Details Using DirectX Diagnostic Tool
- Open Run dialog (Windows key + R) and type “dxdiag” to launch DirectX diagnostic Tool. Click Yes if any prompt appears.
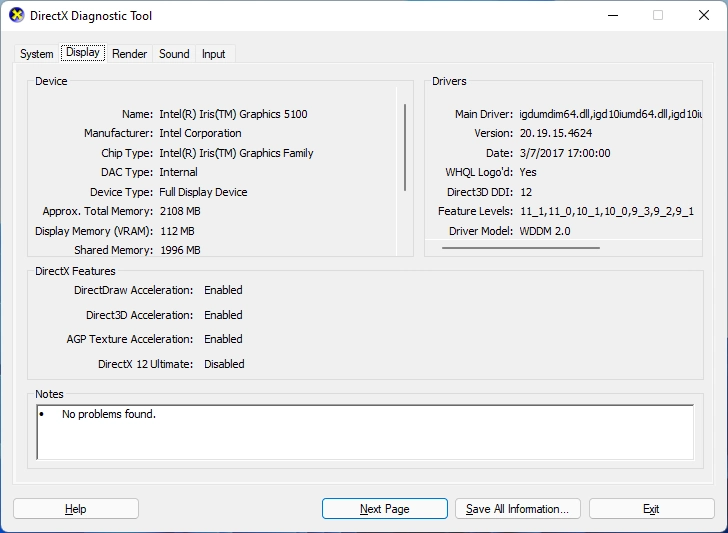
- Click the Display tab.
- Under the Device label, you will find the graphics card memory, type, and manufacturer details.
7. How to Check What Graphics Card You Have with Command Prompt
This method is useful if you want to know just the graphics card name and not other details.
- First of all, open the command prompt window. For that press Windows key + R and type cmd.
- To print the name of the video card, issue the following command:
wmic path win32_VideoController get name. - For a bit more information regarding your card, issue this command:
wmic path win32_VideoController get name, videoarchitecture, deviceID, adapterram.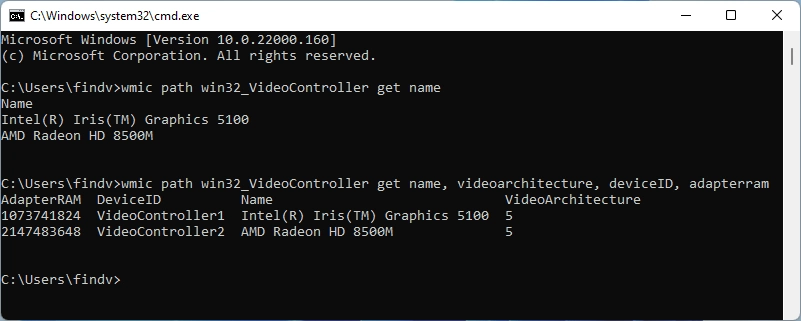
8. Check What Graphics Card Do I Have Using PowerShell
In PowerShell also you can use commands to display the video card details in a jiffy. Just follow these steps.
- Launch the PowerShell first. You can easily do this by right-clicking on the Start button and then selecting Windows Terminal (Admin) option. Alternatively, press Windows key + R and then issue the
powershellcommand. - Now in the PowerShell window, type
Get-WmiObject win32_VideoControllerand hit Enter. It will display all the available information regarding your graphics cards. Check the “Description” field to see the name of the card.
9. How to Check Graphics Card Details Using Third-Party Program
When you search on the web, you will be presented with a myriad of third-party application to check specs and other details of almost everything on your computer. But we are using Speccy only. Although both free and paid version are available, the free one can serve us with most of our requirements. Here are the steps to find out graphics details using Speccy.
- Download Speccy.
- Install and launch it.
- In the summary itself that appears when you open, you can see the name of the graphics card available on your system. If you want more details click on Graphics in the left pane and then expand each options.

Speccy can also be used to find out details regarding Motherboard, OS, CPU, RAM, Storage, Audio, Network, and even more.
10. How to Check Your Graphics Card Model Physically
Without using this method, you can easily find out every information about your graphics card. We’ve included this method just to make you aware of the existence of such a method.
This method involves checking the graphics card physically by opening your CPU cabinet (if you have a normal desktop PC).
Warning: You should take utmost care while dealing with the hardware inside, Switch off your PC completely and discharge any residual static electricity before opening and placing hands on the motherboard. Do it at your own risk!
You can easily spot your graphics card on your motherboard as it should have at least a cooling fan with it.
If you need to unplug it from its place, make sure to remember the spot from where it is unplugged. If you fail to plug it back correctly, your screen (display) won’t work properly.
If you are opening and dealing with the motherboard for the first time, we recommend you to take a photo of the motherboard before dismantling the card. This will help you get out of any confusions while re-plugging.
Figure Out Your Graphics Card Details With Ease!
So, regardless of the reason why you are wanting to check your graphics card particulars, you can make use of the above explained methods. Out of the 10 methods my favorite is checking it with System Information as it pulls out a hell lot of data about the video adapter installed on your system.
We hope that this guide could help you know the graphics adapter details easily and if you still have any queries left behind, just drop a comment below.