Are you trying to find MAC address on Windows 11? Here are five different methods to do this with ease. While using the brand new Windows 11 operating system, sometimes you may come across the requirement to find your system’s mac address, for example, to modify the networking permission on your router, identify devices, or even for data recovery. Whatever the reasons are, this guide will help you locate the MAC address on your Windows 11.
MAC stands for Media Access Control. And the MAC address is a unique identifier assigned and stored by the manufacturer to a physical network adapter or a Network Interface Card (NIC). The said artefact, along with the Internet Protocol (IP) address, facilitates communication in a network. It takes the format of a set of six two digits or two characters separated by hyphens. A typical MAC address would look like this: 2C-54-91-88-C9-E3.
In Windows 11, finding your MAC address is just a walk in the park. Also, you have several ways to see it in a jiffy. Here we explain five methods by which you can quickly locate the address. So without further ado, let’s check them one by one.
Contents
1. How to Find Mac Address Using Settings App
Using the Settings app is the most basic way to locate the MAC ID of your system. If you are an average user, you may find this as a direct way of doing this. Anyway, to get the MAC address, use these steps:
- First off, open the Settings app. You can either use the Search feature right in the taskbar or the Settings icon right in the Start Menu in the Pinned apps section at the top. Alternatively, you can use the Windows Key + I keyboard shortcut.
- Second, click Network & internet option in the left navigation pane.

- Here you can see the name of your network to which you are connected, and under that, there is an I button with Properties. Click on that it will take you to the complete list of details regarding your connection.

- Once inside the network properties, scroll down until you see the Physical address (MAC) written in bold. And you can locate your system’s MAC address just below that. Refer to the screenshot below.

2. How to Find Mac Address Using System Information
- Open the Search from the taskbar and search for System Information. From the search result, choose the best match to land on the system information.

- Once inside the system information window, you can see the system summary on the left pane. From there, you get to click and expand the branches in the order: Components, Network, Adapter.
- Click on the Adapter and wait for a second to get the refresh the adapter information. Once the information is loaded, you can scroll down to find the name of the network adapter you are using and the corresponding media access control address.

3. How to Find Mac Address Using Control Panel
Using Control Panel is also a traditional way of finding MAC ID on Windows PCs. Here are the steps you need to follow to locate your MAC address.
- Open the Control Panel first. You can do this by searching and choosing the best match.

- Click on Network and internet option.

- Then click Network and sharing center.

- Once inside the sharing center, click on the Change adapter settings from the left pane.

- Now double-click on either Ethernet or Wi-Fi depending on what type of connection you are using.

- A status window will open now and from there, click on the Details button.

- In the next window, you can see the details of your network adapter, and from then, you can locate the MAC address with ease.

Note that here you will not see the name MAC address as such. Instead, you will only see it labelled as Physical Address. And both are the same—no need for confusion.
4. How to Find Mac Address Using Command Prompt
To find MAC address on Windows 11 using command prompt, you can follow the below-given steps:
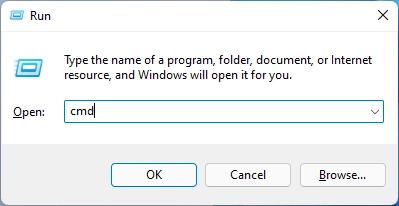
- Firstly, open the command prompt window. To do so, you can either search for the command prompt using the Search icon in the taskbar or use Windows key + R to open the Run dialog and type
cmd.
- Type the command
ipconfig /allin the command prompt window and hit Enter to determine the MAC address.

- From the details in the command window, you can find the MAC address listed in the Physical Address field.
- To show the MAC address of the network adapters along with their names and some other details such as connection name, transport name, etc., you can use the command
getmac /v. If you miss using the/vflag, you won’t see the network adapter name.
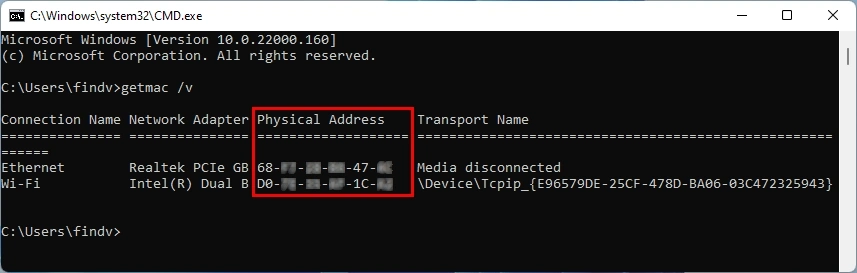
Once you complete the above steps, you will know the MAC addresses of all the network adapters installed on your Windows 11 PC.
5. How to Find Mac Address Using Windows Terminal (PowerShell)
The last method to determine the MAC address is using the Windows Terminal or PowerShell. Follow these steps.
- Launch Windows PowerShell using Search (as usual), or you can right-click on the Start button and select Windows Terminal.

- When the PowerShell opens up, issue the following command:
Get-NetAdapter.

- Once you issue the command, the PowerShell will list out the MAC addresses of the network adaptors on your Windows 11 PC.
Finding MAC Address on Windows 11 Can be Easy
Hopefully, by now, you know how to locate the MAC address on your PC while using Windows 11 OS. Now it’s time to do whatever you need to do with your MAC address. If you don’t want to take up the risk (depends on you 😉) of remembering the MAC ID of your system, pick one of the methods explained above and use it whenever you need. Do so would be far better than jotting it down anywhere and searching for it when needed.
I prefer using command prompt because I love to use commands rather. If you are unlike me, go with the usual methods so that you don’t need to remember any commands.
More Windows 11 Resources
For more useful articles, tips, and other guides about Windows 11 operating system, mosey over the following resources:
- How to Take a Screenshot on Windows 11 (Illustrated Guide)
- How to Find Computer Specs on Windows 11 (5 Methods)
- How to Check RAM on Windows 11 (Size, Speed, and Type)
- How to Factory Reset Windows 11
- How to Turn on Bluetooth on Windows 11
- How to Change the Default Browser on Windows 11