Looking for a way on how to stop Windows 11 updates? Then you are at the right place. We have given 5 methods to disable automatic Windows 11 updates.
Most of the users need to stop these updates when they are seeing updates during turning off or restarting their PC. This makes you trouble as they waste your valuable time during urgency. Also, the data usage by these updates will exhaust the internet usage (consume your data). Due to these reasons, users try to turn off the automatic updates.
Before you carry out the methods, read carefully and do it at your own risk. We always suggest the system always be updated by these updates in order to avoid errors and security bugs on the operating system. So if you don’t need any OS updates, then read this article to disable Windows 11 updates.
Contents
How to Stop Windows 11 Updates
- Open Settings using the shortcut
Windows + Ior you can type Settings in the search bar and, can click on the settings from the search results. - From Settings, click on Update & Security Tile.

- Then Windows update window will be opened, if it’s not then choose Windows Update from the left sidebar.
- Click on pause updates on 7 days.

By this, the updates will be paused or stopped temporarily for 7 days. You can also change the period (here 7 days) to your desire by going through the advanced options in the Windows Update Window. You can also resume this whenever you prefer to do.
How to Disable Windows 11 Update Services
- Click on the search button on the taskbar. Types Services in the search bar.
- After getting Services in the search results, click on the Services app.

- Scroll down to the bottom and search for Windows Update services. Click on Windows Update.

- After clicking on it, the Windows Update Properties will be opened.
- Click on the Startup type. Choose Disable from the list.
- finally, the updates will be stopped.
Disable Windows 11 Update by Enabling Metered Connection
By setting up the metered connection, a limit can be made on the internet usage that can prevent Windows updates.
- Use the shortcut
Windows + Ito open settings. - Select Network & Internet from the settings.

- Next, the status (Network Status) window opens.

- Click on Properties.
- Scroll down to find Metered Connection Menu.

- Toggle the Metered Connection switch and this helps to control the usage of data. Thus the updates can be stopped by this.
How to Turn Off Automatic Windows 11 Updates via Registry
Using Registry to turn off automatic updates on Windows 11 is a risky task and it may destruct the system restore point. So it’s better to keep a backup before heading to disable updates by this method.
- Type Registry Editor in the search bar. Click on the Registry Editor.

- Enter the given path in the path section or you can simply copy-paste this path after “Computers” in the path
HKEY_LOCAL_MACHINE\SOFTWARE\Policies\Microsoft\Windows

- On Right-clicking on the Windows that can be seen in the sidebar, you can add Key by pointing to New>Key

- Name the Key as WindowsUpdate. After that add a key for the newly created key ‘WindowsUpdate‘. Enter the name of the key for WindowsUpdate as ‘AU‘.

- Right-click on the AU and point to DWORD (32-bit) value. Give the name as NoAutoUpdate.
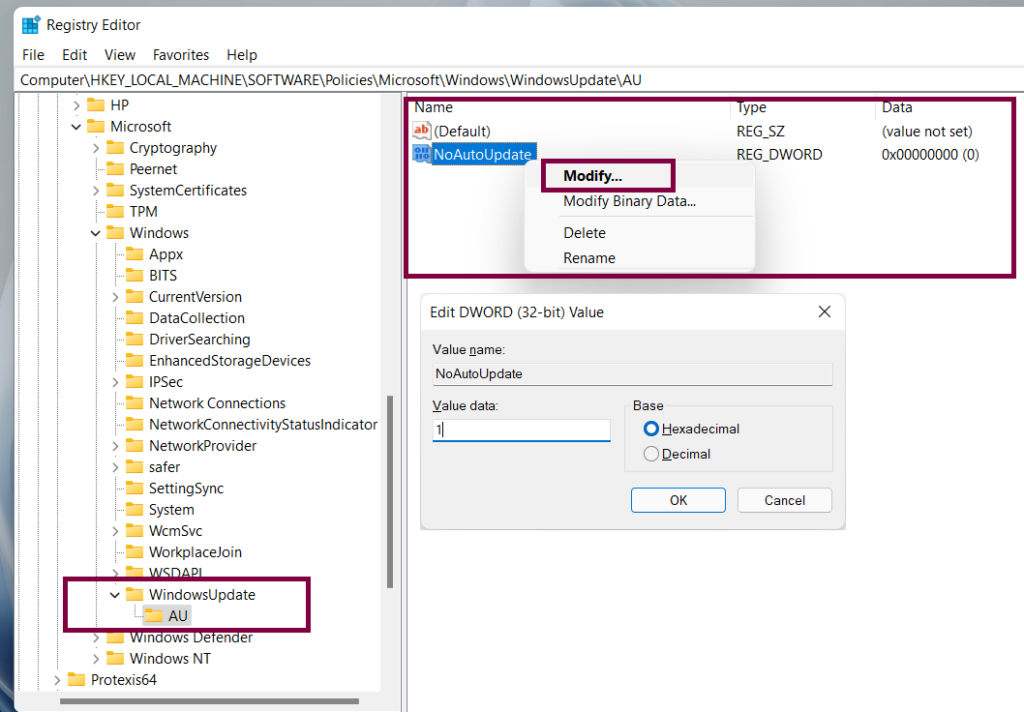
- Right-click on NoAutoUpdate, then click on modify or you can directly double click on the NoAutoUpdate and change the value to 1 (by default it would be 0).
- Reboot for your system is required thereafter to enable the mode (No Auto updates) as well.
How to Turn off Windows 11 Updates with Group Policy
This method is exclusively for Windows 11 Pro version and for the home version you have Registry editor. As mentioned in the registry editor method you need to keep a backup to avoid risk factors since these are risky jobs as well.
- Search for Group Policy Editor in the search bar of the Windows 11 Pro version. Click on it after the search ends.

- In this editor, you just need to head to the following path Computer Configuration > Administrative Templates > Windows Components > Windows Update

- Double-click on the menu (Configure Automatic Updates) that we are looking for after opening the Windows Update page.
- After clicking the next window will be popped up and you can disable the button to turn off the automatic updates.

- Finally, Click on Apply after turning off the toggle. Then you just need to restart your PC in order to apply the changes that we have made.
Final Words
So, now you know how to stop Windows 11 updates. You can also resume or re-enable the updates in the future if you need an update. By disabling the auto-update features, your pc will be vulnerable to bugs and errors. So it always is suggested to update regularly whenever the updates are available. If you have any queries regarding this article lets us know through your comments.
Related articles:
- How to Hide Taskbar in Windows 11
- Windows 11 Media Creation Tool
- How to Turn on Bluetooth on Windows 11
- How to Screenshot on Windows 11
- How to Find Computer Specs on Windows 11